Balancing a checkbook is one of those tasks that seems like it should be very easy but is really an accounting nightmare! When I got my first job as a teenager, I had my own checking account that I would dutifully balance “to the penny.” Of course, it was easy to do it then because there were very few transactions to worry about. Once I left home, got married and began my own household, balancing “to the penny” became time consuming and difficult with the paper-based system. Often I was happy if I was within about $10 of balancing. My husband’s system at that time was just to keep a rough idea in his head of how much was in the account. After an embarrassing bounced rent check, he quickly converted to my written system.
Our finances got complicated quickly with two paychecks to keep track of and bills, bills, bills. About the time I began to complain to my husband that the bank must be stealing money out of our account because my fine accounting skills could certainly not be to blame, he insisted that I learn to use computer-based checkbook software. I grudgingly consented and today I would not be without financial software.
While there are those who swear by their paper-based methods, today’s world of finance moves too quickly not to use the computer. Once you have your accounts set up on the computer, you can know in a few seconds what your checking account balance is, how your retirement account is fairing in the stock market, what your net worth is, how much you spent on groceries last year, and other helpful data. Yes, you can do this on paper too but it takes much longer to figure out–hours or even days.
The computer is not without its frustrations and problems, though. I have been primarily working with Quicken software for about 10 years now. While there are a lot of things to like about Quicken, I have become increasingly frustrated with some of Quicken’s business practices. When Quicken stopped using the universally available .qif format in favor of the proprietary .qfx format, I had to reset a lot of my accounts and some banks no longer seem to participate in the automated “One Step Update” download feature that used to work so beautifully. I also have been disappointed in the advanced analysis tools available in the software. Many of the analyses I get from Quicken are just plain wrong (perhaps because I have not entered my transactions in exactly the right way Quicken wants them–which seems to change from time to time) and I have to do my own calculations anyway. Despite numerous upgrades over the years, there haven’t been a lot of significant improvements in Quicken either. Currently, my 2009 Quicken software now crashes on me 3 times each time I try to upload my checking account information before it finally loads on the fourth try for unknown reasons.
Despite all these problems, I still believe that everyone should learn to manage their finances electronically. At a minimum, you should track your primary checking account and the main credit card you use. As you become more knowledgeable, you can add investment accounts, loan obligations, your asset accounts and other transactions to round out your financial picture.
Below, I tell you how to get started balancing your checkbook with GnuCash, a FREE open source software download.
BALANCING YOUR CHECKBOOK WITH GNUCASH
1. Download the Gnucash software at http://www.gnucash.org and install it on your computer.
2. When the software opens, close the Tip of the Day box and choose “Create a new set of accounts.” in the pop-up window that appears.
3. Find the window called “New Account Hierarchy Setup” (might be hidden behind some other windows). Click “Forward.”
4. Choose currency (for most of my readers, USD (US Dollar)), then click “Forward.”
5. Choose the accounts you want to create and then click “Forward.” If you are worried about being overwhelmed, start with just “Common Accounts.” The Medians would choose to set up the following:
Childcare Expenses
Common Accounts
Education Loan
Home Mortgage Loan
Homeowner Expenses
Retirement Accounts
Spouse Income
Spouse Retirement Accounts
In the next window “Setup New Accounts,” you can make changes to the accounts you have just created. If this is your first time using software to monitor your accounts, decide when you are going to start. January 1, 2010 might keep things simple. If you use this date, then you need to know the balance in each account as of the last transaction on December 31, 2009. In the Medians case, I will assume they have $100 in their checking account on December 31, 2009. You can type the opening balance directly into the list.
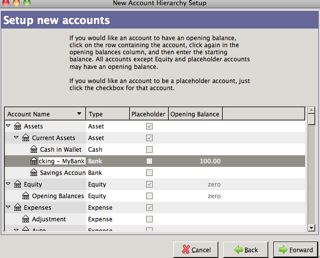
If you have more than one checking account, you might want to rename the checking account to Checking-NameofBank, ex. “Checking – MyBank.” Don’t get overwhelmed here! If you are ready to give up because it seems too complicated, don’t worry about picking all the different options or entering balances, just click, “Forward.”
7. On the next screen, click, “Apply.”
8. You will then see a screen with a summary showing, Assets, Equity, Expenses, Income, Investments, Liabilities. Click the down arrow to the left of Assets and then the down arrow next to “Current Assets” to get to your checking account ledger.
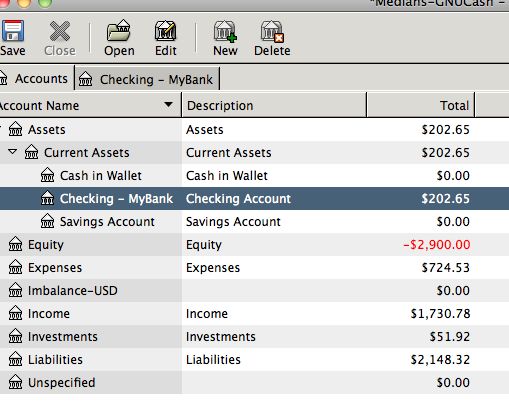
9. If you put in an opening balance, it will show up as the first transaction in the ledger. Change the date of the opening balance to 12/31/09. You do this by clicking on the date and either typing 12/31/2009 or clicking on the little box to the right of the date and selecting the date from the calendar that appears.

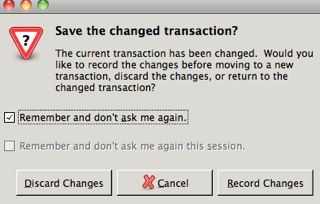
10. When you try to change something, a warning box comes up. Click the box for “Remember and don’t ask me again.” then click, “Record Changes.”
11. Now you are at a point where you have a choice to enter in the transactions from January 1, 2010 to the present. You can either enter them by hand based on your most recent account statements or, if your bank offers it (and most banks do), you can download the transactions from the bank’s website.
12. To do an automated download, sign in to the bank’s website and follow the instructions to download the account information. Most banks offer .qif format. Typically, when you select .qif format, you have to specify the date range you want. It is usually a good idea to put the dates you used in the saved file name. So, for example, you might save the file as “2010-01-01-to-2010-03-05-mybank-checking.qif.”
To import these files into GnuCash, you select, File, Import, Import QIF… from the GnuCash main menu.
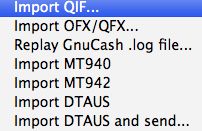
This will load a helper menu. Click forward on the first screen and on the next screen, click, “Select” to find the file you saved from your bank. (You might need to double-click to get the file to be accepted.) Then click “Forward”
The next screen asks what the name of the Account is that you want the QIF transactions imported into. Type the name of the checking account, in my case, “Checking – MyBank”
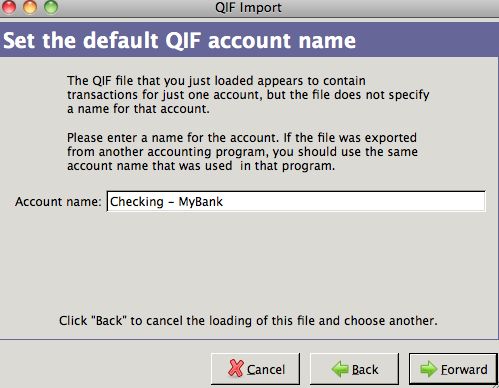
On the next screen showing the QIF files you loaded, click, “Forward”
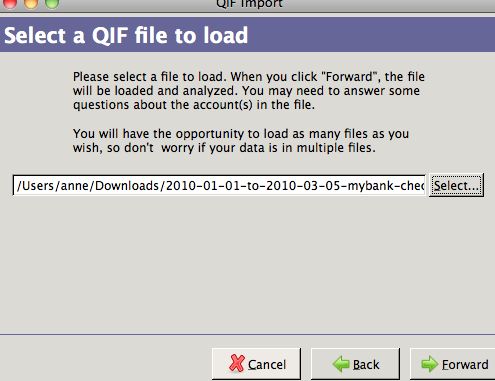
On the next screen, that essentially tells you that GnuCash might create accounts for you based on the downloaded information, click, “Forward.”
On the next screen, GnuCash is asking you to confirm that it is putting the downloaded transactions into the right account. You can see that it is going to download the Medians’ transactions into Current Assets: Checking – MyBank, which is correct. Click, “Forward.”
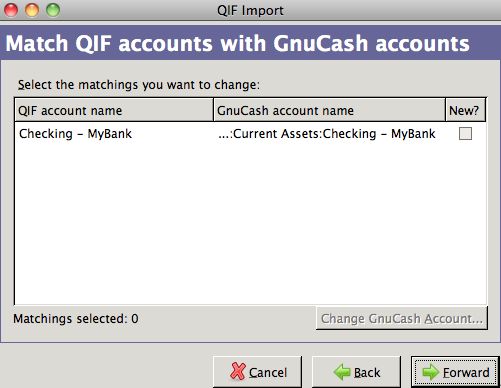
On the next screen, GnuCash essentially tells you that it might need your help to categorize some of your downloaded data, click, “Forward.”
On the next screen, you might get a long list of things that look kind of scary. Relax! If you can’t figure out what these transactions are, just click, “Forward.” Otherwise, if you see a transaction you recognize, in my example, an electric bill, you can tell GnuCash that this is an electric bill so it will remember this for the future. If you want to do this, highlight the name of the bill, then click the “Change GNUCash Account” button and then select Expenses, Utilities, Electric, OK. Repeat for any identifiable bills.
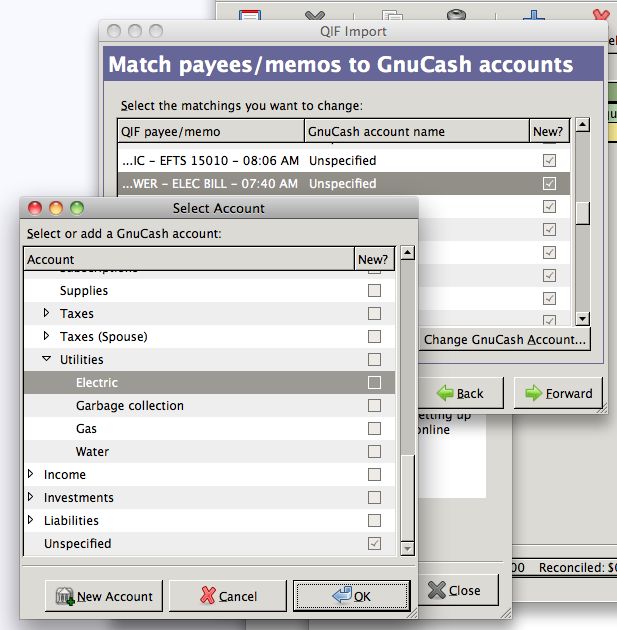
When you are done, click, “Forward.”
On the next screen, select the currency of the transactions. For most readers, it will be USD (US Dollar), then “Forward.”
On the next screen, click, “Apply.”
13. You are now in your check register! Your job is to go through each transaction one by one and give each one an appropriate category. You might want to modify the “Description” category to be something you remember. I usually use the name of the vendor, ex. “Acme Power,” or “MyKids Child Care Center.” In the “Transfer” category, select the category of expense. Most of your expenses will be easy to recognize. Get familiar with how GnuCash titles each category. Restaurant meals are called “Dining.” Your water and gas bills fall under “Utilities,” etc. When you get more familiar with GnuCash you can change all these names but if you are feeling overwhelmed just stick with how they are called now.
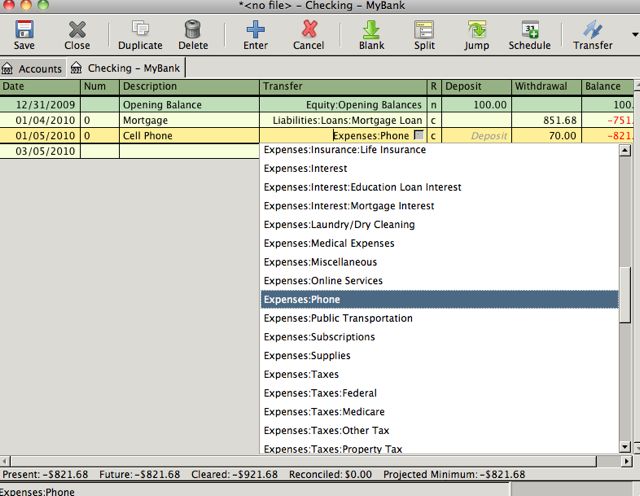
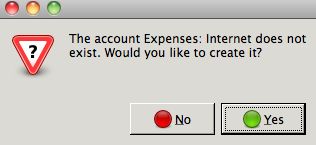
14. What if you need to add a new category? We’ll use the Medians as our example. Let’s say you want to add a special category for Internet access because you don’t like the “Expenses:Online Services” category or you use that category for something else. In the expense category, you can just start typing the name, “Expenses:Internet.” When you are done typing the name, press enter. You will get a little warning box, select “Yes” to create the new category. Click “OK” on the next box that comes up.

15. How do you enter a paycheck? This can be a little confusing but once you do it a few times, it won’t seem hard to you. Let’s use Mr. Median as an example.
In the ledger, find a blank line and enter the date of the paycheck and a good description. In your case you might put the name of your employer and the word paycheck, such as “Acme Inc. Paycheck.” Then, click the “Split” button.

This will open up some subcategories in your paycheck. Type in the net amount of the paycheck (after all deductions) in the first category that is created by default (Assets: Current Assets: Checking) then hit “Tab” to move down to the next line. Enter in all the deductions to your paycheck one by one, giving each the appropriate category. At the end, you will enter in the gross amount of the paycheck (before deductions) as Income: Salary. Mr. Median’s paycheck looks like this:

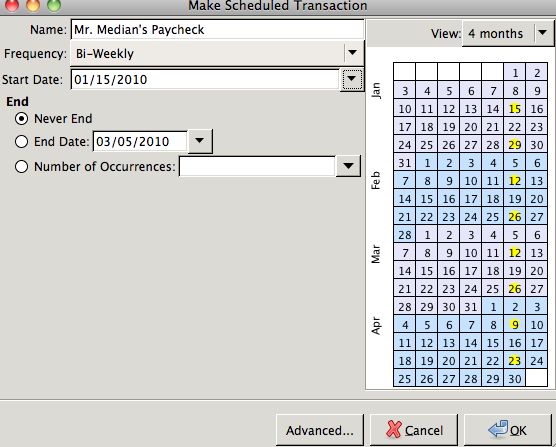
After you have done all the work to set up the paycheck and assuming the paycheck is the same every two weeks, you can click the “Schedule” button. If Mr. Median is paid every two weeks, select “Bi-Weekly” from the drop-down box and the start date of his first 2010 paycheck (usually 1/15/2010) and click OK. (For me, I had to save, close and re-open GnuCash to get a pop-up window asking me to click OK to auto-populate the paychecks between 1/1 and 3/5.)
16. When you are finished entering all your transactions in your checkbook register, click the “Reconcile” button. A box will come up asking what the ending balance in the account is. You can either look this up manually on your account statement or by logging into your account on the bank’s website and type it in or it might be automatically populated if you downloaded the transactions from your bank’s website.
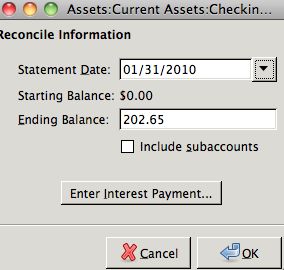
In the next window, you will see a list of your “Funds In” on one side and “Funds Out” on the other. You can check the last column under “R” to indicate the transaction has cleared your account. When you are done checking all the cleared transactions, the “Difference” value at the very bottom of the window should read “$0.00.” Here is the Medians example:
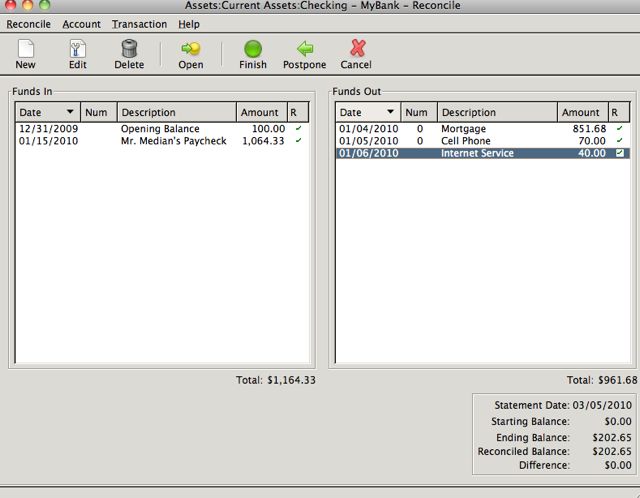
Click the green “Finish” button at the top of the window to complete the reconciliation.
17. Before closing the program, click File, Save and select where to save the file. You will also want to save a backup copy to a CD, flash drive or other location. You don’t want to lose all your hard work!
I hope that the above information inspires you to have the courage to taken on computerized checkbook management. While it helps to understand accounting principles, it is not necessary and you can learn to do this!
If you try the above instructions and you are having trouble, please post a comment and I’ll see if I can help you. You can also check out the GnuCash Help Manual here.
Hang with me! Even if you are not up to electronic checkbook management, please continue to read and don’t give up. Every little bit you learn about managing your finances will help you. You don’t have to understand everything all at once.

